


The camshaft sensor is an essential element of a vehicle’s internal combustion engine, ensuring that the engine functions efficiently and effectively. Sometimes, the camshaft gets faulty due to less maintenance and care of the vehicle. If your car’s engine has been producing a loud noise and you have identified the camshaft sensor as its source, replacing it is an obvious first move.
After replacing the camshaft sensor there are a few steps to make sure its proper working. Today, I am writing this guide to clarify what to do after replacing camshaft sensor.
After installing a new camshaft sensor, reprogramming it with an OBD-II scanner is essential. If not, the engine computer will still obtain wrong signals from the primary sensor, leading to cylinder misfire and other driving issues. Therefore, remember this step – reprogramming is necessary for your vehicle to run optimally!
Before going in-depth, it is essential to know about camshaft sensor and how it works.
Table of Contents
What is a camshaft Sensor?
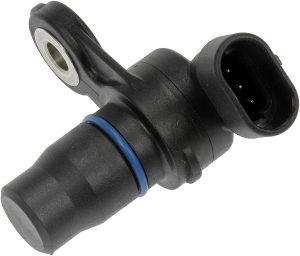
A camshaft sensor is an important part of modren vehicles that monitors the position or rotational speed of the camshaft. The engine control unit (ECU) utilizes this data to optimize ignition timing and additional preferences. The camshaft sensor can be either a variable reluctance, hall-effect or optical device. It reads notches or protrusions on the camshaft and converts their position into electronic signals sent to the ECU for processing.
The principal role of a camshaft sensor is to guarantee that every single cylinder within the engine ignites simultaneously and with the precise amount of fuel for optimum performance. When this information is accurately determined, it improves performance, reduces fuel consumption and ensures that exhaust emissions remain low. Using the camshaft sensor, the ECU can more accurately control ignition timing and fuel delivery, resulting in smoother running and greater efficiency.
Another benefit of a camshaft sensor is that it allows diagnostics on an engine by retrieving trouble codes from the ECU. This can help identify problems such as faulty ignition or fuel delivery systems, worn valves and other issues which would otherwise require detailed mechanical inspection.
In short, a camshaft sensor is an important component of modern vehicle engines, which helps to ensure efficient operation through accurate monitoring of the position or rotational speed of the camshaft. Its use helps reduce fuel consumption, improve performance and allow for easier diagnosis when faults occur.
What to do after replacing camshaft sensor
After replacing the camshaft sensor, a few additional are required to ensure your vehicle is running at its peak performance. First, you should reset the check engine light to clear any trouble codes related to the issue with the camshaft sensor. You have to disconnect the car battery for 5 to 10 minutes and then reconnect it.
Then you will need to reset the timing on your engine’s crankshaft position sensor if required. This will help ensure that your new camshaft sensor accurately reads information from the crankshaft position sensor and sends it back to your engine’s computer.
Finally, take your car on a test drive and run some diagnostics. Test driving help you to check whether the camshaft sensor working correctly or not. Check for any warning signs, such as strange noises or vibrations, that indicates problem with camshaft sensor. If you don’t know what to do after replacing camshaft sensor follow these setps.
By following these steps after replacing your camshaft sensor, you can help ensure your vehicle continues running smoothly and at peak performance for years to come.
Buy on Amazon
Symptoms of Bad Camshaft Sensor
The camshaft sensor is an essential component engine that maintains the timing and speed of the internal combustion process. A malfunctioning or bad camshaft sensor can cause various symptoms, including poor engine performance, decreased fuel economy, hard starting issues, stalling and rough idling, misfire codes, and check engine light illumination. If any of these symptoms are present in your car, it may indicate a problem with the camshaft sensor.
Engine light illumination
When the camshaft sensor malfunctions, it will trigger a check engine light on your dashboard. The light may come on and stay lit or flash intermittently. This indicates an issue with the camshaft sensor and should be addressed immediately.
Poor engine performance
A bad camshaft sensor can cause poor overall engine performance as it regulates the timing of how much fuel enters the combustion chamber and when to ignite the spark plug. As a result, you may experience diminished power while driving and decreased acceleration when trying to accelerate quickly, such as merging onto highways or passing other vehicles.
Decreased fuel economy
A faulty camshaft sensor can lead to less efficient fuel burning in each engine cycle. This can cause a decrease in fuel economy and an increase in your overall fuel costs.
Hard starting
Difficulty starting your vehicle or having to crank it multiple times before the engine turns over can be caused by a bad camshaft sensor. The sensor’s malfunction may prevent the spark plugs from receiving enough energy to ignite the fuel in each cylinder, leading to hard starting issues.
Stalling and rough idling
A malfunctioning camshaft sensor can also cause stalling or uneven idle due to incorrect timing of when the spark plug should fire off its ignition cycle. As a result, you may experience stalling while driving or rough idle that causes your vehicle to vibrate while stopped at traffic lights or stop signs.
Misfire
If your camshaft sensor is malfunctioning, it can cause the spark plugs to fire off at incorrect times, leading to misfires in the engine. This can create diagnostic trouble codes that may appear on a scanner tool when connected to your vehicle’s onboard computer. It is important to address any misfire codes immediately, as they can cause further damage if left unchecked.
In addition to these common symptoms, further signs that your car’s camshaft sensor is malfunctioning include loud ticking noises from the engine block when the ignition key is turned “on” and exhaust smoke from increased oil consumption. It is critical to keep an eye on the camshaft sensor and replace it if needed, since a malfunctioning one can cause further engine damage unless looked at soon.
If you find that your car’s camshaft sensor has become faulty, immediately take it to an auto shop for maintenance or it cause further damage. For best results, always choose an OEM (original equipment manufacturer) replacement part when replacing the camshaft sensor to ensure optimal performance and compatibility with your vehicle’s make and model.
Also Read: How To Disable Steering Wheel Lock
How to Check a Camshaft Sensor
To diagnose a camshaft sensor, you’ll need to find its exact location on the engine and gain access for testing.
- Locate the Camshaft Sensor: The location of the camshaft sensor will different depending on your make and model of car. It is typically located near your engine block’s top middle area.
- Disconnect Power Supply: If necessary, to test or inspect any component in the engine, you will need to disconnect your vehicle’s power supply or battery.
- Inspect the Wiring and Connectors: Check for any visible damage on the wiring and connectors of the camshaft sensor. If there is corrosion on either end, this can cause signal issues resulting in poor performance from your engine.
- Test with an Ohmmeter: To check that a camshaft sensor works properly, use a multimeter or ohmmeter to test for continuity on all connector terminals. The voltage reading should be within the specified range as indicated by your car’s manual; if not, this means a faulty camshaft sensor.
- Reinstall the Camshaft Sensor: Once you have finished testing, you can then safely reinstall the camshaft sensor into its original place. Make sure to reconnect the power supply and that all connections are properly secured before turning on your engine.

How To Replace Camshaft Sensor
Replacing a camshaft sensor is a simple task. Almost anyone can do it with basic mechanical skills and the right tools. The process involves:
- Removing the old sensor.
- Installing the new one.
- Reconnecting any wiring or other components that have been disconnected during removal.
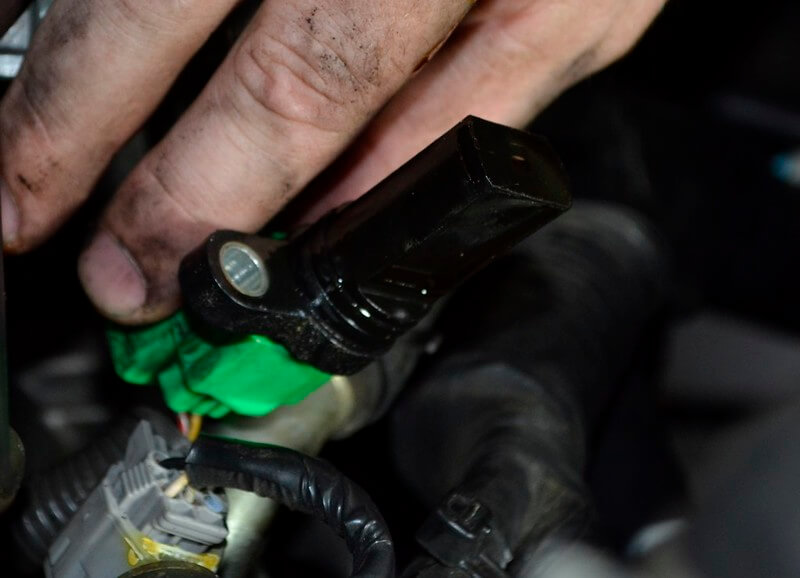
Before anything else, switch off your car’s engine. Then, locate the camshaft sensor. Depending on your vehicle’s make and model, it generally situated near or in front of the cylinder head. Once you have located the camshaft sensor, disconnect any wiring or other components. Remove any bolts holding it in place as well; this will vary depending on your car’s model.
Then, take out the outdated camshaft sensor and swap it with a fresh one. Make sure that the new part is properly aligned and correctly installed. Once in place, connect the wiring or other components and tighten any bolts as needed.
Finally, start your vehicle and test the camshaft sensor to ensure it works properly. If everything is okay, you have successfully replaced the camshaft sensor! Be sure to monitor its performance for any potential issues down the road. Congratulations – you have completed this task!
Frequently Asked Questions
When should you reprogram your camshaft position sensor?
Once you have successfully installed your new camshaft position sensor, you must reprogram the device. Additionally, you should use an OBD-2 diagnostic scanner to erase any error codes stored in your engine’s control unit for optimal performance.
Furthermore, suppose you experience any issues with your vehicle’s operation after replacing the sensor, such as stalling or misfiring. In that case, it is best to reprogram the camshaft sensor its proper functioning. Additionally, you should regularly inspect and reprogram the camshaft position sensor every 30,000 miles to maintain optimal performance over time.
Doing so can help you avoid costly repairs due to a faulty component. If you are confused and don’t know on how to reprogram your camshaft position sensor, it is recommended to get in touch with an experienced mechanic or technician for professional advice.
How to Reprogram camshaft sensor?
First, locate your ECM near the firewall on either side of your vehicle’s dashboard to begin reprogramming your camshaft sensor. Next, connect a diagnostic scanner with a cable to your car’s OBD-II port. This port is typically found beneath the steering column or near the center console and is labelled with a sign that looks like a wrench.
Once your scanner is connected to the OBD-II port, you must access the ECM menu for reprogramming options. To ensure the best and most accurate results, be sure to read your user manual for detailed instructions for replacing sensor – as the procedure may differ based on your vehicle’s make and model. Once you have accessed the programming option in the ECM menu, select “camshaft sensor” from the list of available parameters.
Next, follow any prompts your diagnostic software provides to enter new parameters into the camshaft sensor. Depending on your make, model, and car year, several different parameters may need to be adjusted. Consult your user manual or an online guide for specific instructions on what values should be entered into each parameter.
To ensure your new parameters have been successfully entered, make sure to save them. This can be done simply by pressing a ‘save’ button or selecting ‘apply’ from the menu. Once the changes have been successfully saved, disconnect the scanner from the OBD-II port and start your engine.
Also Read: Temporary Fix for Crankshaft Position Sensor
What Could Lead to a Camshaft Sensor Malfunction?
There are a few potential causes of a camshaft sensor malfunction, including:
- Wiring Issues – Faulty wiring or connections can prevent the camshaft sensor from communicating with the vehicle’s computer system.
- Sensor Damage – Physical damage to the camshaft sensor can cause it to malfunction. Damage Sensor could be due to a collision, excessive heat or moisture exposure, or improper installation.
- Contamination – Oil or other debris can accumulate on the camshaft sensor and cause it to malfunction. Contamination is particularly common in older vehicles with worn or inadequate oil seals.
- Faulty Computer System – Malfunctioning vehicle computer systems can also cause the camshaft sensor to malfunction. A faulty Computer System could be due to a defective module, incorrect programming, or other issues.
- Loose Mounting Bolts – If the mounting bolts become loose, the camshaft sensor can move out of its correct position and cause it to malfunction.
How Much Does It Cost to Replace a Camshaft Sensor?
Cost to replace a camshaft sensor depends on your car brand and model and the complexity of replacing. The cost could range from make and model to make and model – so keep that in mind when making your decision! In general, replacement camshaft sensors range from $50 to $200.
You may also need to buy extra components, like a new gasket or wiring harness, that can increase the overall price. Labour costs for professional installation may be included in the price, or you may need to pay a separate fee for labour. It’s always best to consult your local mechanic or dealership for an accurate cost estimate to replace a camshaft sensor.
Conclusion
Consequently, replacing the camshaft sensor is crucial for preserving both the efficiency and dependability of your automobile. After installing a new senor it’s important to test its performance and quality to guarantee that everything is working correctly. Finally, always reset the check engine light and run a scan to ensure that any codes related to the camshaft sensor have been cleared. Use these tips and your vehicle will be running at its optimal level. Above mentions steps are answer, if you don’t know what to do after replacing camshaft sensor.